| |
WORK WINDOW
The work window of the applet consists of three main parts:
VECTOR INSERTION PANEL
|
The vector insertion panel shown in Figure 1 has two subpanels:
In the LFSR mode, the first subpanel is used for initializing the LFSR. The LFSR based Automated Test Pattern Generator (ATPG) is used for emulating different BIST ideas. The following well known architectures can be emulated by the applet:
The first subpanel is also used when creating test vectors for specific fault detection. In this case the values are inserted one by one into the signal boxes at connections of the design schematics, and the input test vector will be deduced from these internal signal values. |
SCHEMATICS PANEL
The schematics panel displays currently selected circuit. The small boxes at the lines display internal signal values on the connections. The boxes are clickable during manual test vector generation and fault diagnosis. In the test generation mode, the needed signal values for fault activation or fault propagation can be inserted directly at the connections. In the fault diagnosis mode, by clicking the boxes, a guided probing procedure can be simulated. A click on the box shows the result of measuring the “real”signal on the corresponding connection of the simulated faulty circuit. |
|
SCHEMATICS SUBPANEL
Detected faults, signal conflicts etc. are displayed as colored bold wires. Color coding is as following:
|
|
DATA PANEL
The data panel (Fig.3) displays
information about simulated test vectors and detected faults. In the fault simulation
mode you can click on the row of a given test vector and have a visualization
which faults are detected by this vector. In the signal (waveform) mode you
can select all the signals in interest and leave out those which are not.
MENUS
There are four main menus used with the applet:
The schematics menu contains a list of predefined circuits. By the language menu the user may choose one of the currently supported languages from the given list. The help menu provides with useful tips and explanations.
The mode menu tells the applet what is to be done - test vector insertion, manual test vector generation, fault simulation or fault diagnosis (two possible approaches: sequential and combinational diagnosis).
STARTING TO WORK
We start working with the applet by selecting in the schematics menu a circuit from a set of predefined circuits. Then we can carry out different experiments with this circuit by selecting a proper working mode from the mode menu.
TEST VECTOR INSERTION
In the vector insertion mode we create test vectors either automatically by using LFSR, or by inserting vectors manually. In the manual mode, we generate step by step input patterns which are simultaneously simulated. The boxes at the lines on the schematics subpanel display the result of simulation – the values of internal signals on the connections. The waveforms can be viewed on the data subpanel.
When using LFSR, we have to specify the initial state (subpanel I), to set up the feedback structure (subpanel S), and to specify the length of the test sequence. By LFSR we can simulate the BIST concept in two ways: Built-In Logic Block Observer (BILBO) and Circular Self-Test Path (CSTP).
In the BILBO mode a pseudo-random test sequence is generated autonomously by LFSR based on the settings on the subpanels I and S.
In the CSTP mode, the pseudo-random test sequence is generated by both, LFSR and the circuit selected by menu Schematics. By changing the setting on the subpanel S we can emulate different feedback structures of the chosen BIST architecture.
TEST GENERATION
In the test generation mode we choose a target fault in the schematic and create step by step proper activated paths in the ciruit for sensitizing the fault at it`s site and for propagating the erroneous signals towards output by clicking the needed values into boxes on the lines. From these values finally, an input vector will be deduced. The colours on lines help us to understand the current status of the task:
|
|
FAULT SIMULATION
In the fault simulation mode, a fault table is generated and shown on the data panel for all the test vectors created by the given moment. By selecting a vector on the data panel, all the faults detected by this vector will be highlighted by colours on the schematic panel.
FAULT DIAGNOSIS
In the fault diagnosis mode we need at first, to create a fault table by running the fault simulator for a set of previously generated test vectors. Entering into the diagnosis mode will insert a random fault into the circuit.
Two diagnosis strategies can be investigated: combinational and sequential fault diagnosis.
For learning the combinational strategy, a single vector or a subset of vectors can be selected and applied to the erroneous circuit (imitating the testing experiment). The applet shows the results of the experiment in the last column of the Fault Table (Y – means that the test vector passed correctly, N – means that the test vector detected erroneous signal on the output). The Fault Table displays also the subset of suspected faults. To improve the diagnostic resolution, additional test vector(s) may be generated and used in the repeated test experiment.
Sequential diagnosis is based on the guided probing strategy. A test pattern is applied and the expected behavior of the circuit is displayed. By clicking on the connection boxes the probing experiment is imitated, and the real values of signals on the lines are measured. Erroneous signals are highlighted by red lines, correct signals are shown by gray lines. The fault is located either when a gate will be found with erroneous output value and correct input values (a faulty gate) or when erroneous input will be found (a faulty input).
The main challenging point in learning the both diagnostic strategies is to try to localize the fault by as few test vectors or by as few “measurings” of line signals as possible.
| |
|
|
Last update: 28 July, 2004
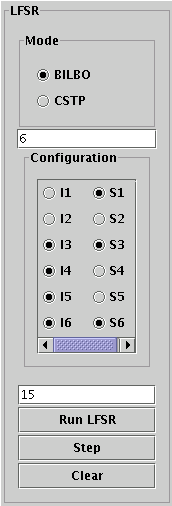 Figure
1. Vector Insertion Subpanel (LFSR part)
Figure
1. Vector Insertion Subpanel (LFSR part) Figure
2. Schematics Subpanel
Figure
2. Schematics Subpanel Figure
3. Wave Table Subpanel
Figure
3. Wave Table Subpanel Figure
4. “Living Picture” for Teaching Digital Test
Figure
4. “Living Picture” for Teaching Digital Test