| |
A unit under test (UUT) fails when its observed behavior is different from its expected behavior. Diagnosis consists of locating the physical fault(s) in a structural model of the UUT. The degree of accuracy to which faults can be located is called diagnostic resolution. Functionally equivalent faults (FEF) cannot be distinguished. The partition of all faults into distinct subsets of FEF defines the maximal fault resolution. A test that achieves the maximal fault resolution is said to be a complete fault-location test.
Repairing the UUT often consists of substituting one of its replaceable units (RU) referred as a faulty RU, rather than in an accurate identification of the real fault inside an RU. We characterize this process by RU resolution. Suppose that the results of the test do not allow to distinguish between two suspected RUs U1 and U2. We could replace now one of these RUs, say U1 with a good RU, and return to the test experiment. If the new results are correct, the faulty RU was the replaced one; otherwise, it is the remaining one U2. This type of procedure we call sequential diagnosis procedure.
The diagnosis process is often hierarchical, carried out as a top-down process (with a system operating in the field) or bottom-up process (during the fabrication of the system).
In the top-down
approach (system ![]() boards
boards
![]() ICs) first-level diagnosis
may deal with "large" RUs like boards called also field-replaceable
units. The faulty board is then tested in a maintenance center to locate
the faulty component (IC) on the board. Accurate location of faults inside a
faulty IC may be also useful for improving its manufacturing process.
ICs) first-level diagnosis
may deal with "large" RUs like boards called also field-replaceable
units. The faulty board is then tested in a maintenance center to locate
the faulty component (IC) on the board. Accurate location of faults inside a
faulty IC may be also useful for improving its manufacturing process.
In the bottom-up
approach (ICs ![]() boards
boards
![]() system) a higher level
is assembled only from components already tested at a lower level. This is done
to minimize the cost of diagnosis and repair, which increases significally with
the level at which the faults are detected.
system) a higher level
is assembled only from components already tested at a lower level. This is done
to minimize the cost of diagnosis and repair, which increases significally with
the level at which the faults are detected.
The rule of 10: if it costs $1 to test an IC, the cost of locating the same defective IC when mounted on a board and of repairing the board is about $10; when the defective board is plugged into a system, the cost of finding the fault and repairing the system is $100.
In manufacturing, the most likely faults are fabrication errors affecting the interconnections between components; in the field the most likely faults are physical failures internal to components (because every UUT has been successfully tested in the past). Knowing the most likely class of faults helps in fault location.
3.2. Combinational Fault Diagnosis Methods
This approach does most of the work before the testing experiment. It uses fault simulation to determine the possible responses to a given test in the presence of faults. The database constructed in this step is called a fault table or a fault dictionary. To locate faults, one tries to match the actual results of test experiments with one of the precomputed expected results stored in the database. The result of the test experiment represents a combination of effects of the fault to each test pattern. That's why we call this approach combinational fault diagnosis method. If this look-up process is successful, the fault table (dictionary) indicates the corresponding fault(s).
![]()
On the applet, select Fault
Diagnosis Mode, after that a circuit layout, insert needed vectors and simulate
faults. A fault table will be produced.
3.2.1.
Fault tables
3.2.2. Fault dictionaries
3.2.3. Minimization of diagnostic data
3.2.4. Fault location by structural analysis
3.2.1.
Fault Table
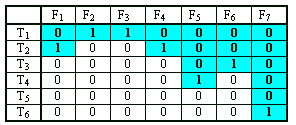
In general, a fault table
is a matrix ![]() where columns Fj represent faults,
rows Ti represent test patterns, and aij = 1 if the test
pattern Ti detects the fault Fj, otherwise if the test
pattern Ti does not detect the fault Fj, aij
= 0.
where columns Fj represent faults,
rows Ti represent test patterns, and aij = 1 if the test
pattern Ti detects the fault Fj, otherwise if the test
pattern Ti does not detect the fault Fj, aij
= 0.
Denote the actual result
of a given test pattern by 1 if it differs from the precomputed expected one,
otherwise denote it by 0. The result of a test experiment is represented by
a vector ![]() where ei = 1 if the actual result of the test patterns does not match
with the expected result, otherwise ei = 0. Each column vector fj
corresponding to a fault Fj represents a possible result of
the test experiment in the case of the fault Fj.
where ei = 1 if the actual result of the test patterns does not match
with the expected result, otherwise ei = 0. Each column vector fj
corresponding to a fault Fj represents a possible result of
the test experiment in the case of the fault Fj.
Three cases are now possible depending on the quality of the test patterns used for carrying out the test experiment:
Example:

In the example the results of three test experiments E1, E2,
E3 are demonstrated. E1 corresponds to the first case
where a single fault is located, E2 corresponds to the second case
where a subset of two indistinguishable faults is located, and E3
corresponds to the third case where no fault can be located because of the mismatch
of E3 with the column vectors in the fault table.
Fault dictionaries (FD) contain the same data as the fault tables with the difference that the data is reorganized. In FD a mapping between the potential results of test experiments and the faults is represented in a more compressed and ordered form. For example, the column bit vectors can be represented by ordered decimal codes (see the example) or by some kind of compressed signature.
Example:

3.2.3. Minimization of Diagnostic Data
To reduce large computational effort involved in building a fault dictionary, in fault simulation the detected faults are dropped from the set of simulated faults. Hence, all the faults detected for the first time by the same vector will produce the same column vector (signature) in the fault table, and will be included in the same equivalence class of faults. In this case the testing experiment can stop after the first failing test, because the information provided by the following tests is not used. Such a testing experiment achieves a lower diagnostic resolution. A tradeoff between computing time and diagnostic resolution can be achieved by dropping faults after k>1 detections.
Example:
In the fault table produced by fault simulation with fault dropping, only 19 faults need to be simulated compared to the case of 42 faults when simulation without fault dropping is carried out (the simulated faults in the fault table are shown in shadowed boxes). As the result of the fault dropping, however, the following faults remain not distinguishable: {F2, F3},{F1, F4},{F2, F6}.
3.2.4.
Fault Location by Structural Analysis
Assume a single fault in the circuit. Then there should exist a path from the site of the fault to each of the outputs where errors have been detected. Hence the fault site should belong to the intersection of cones of all failing outputs. A simple structural analysis can help to find faults that can explain all the observed errors.
3.3. Sequential Fault Diagnosis Methods
In sequential fault diagnosis the process of fault location is carried out step by step, where each step depends on the result of the diagnostic experiment at the previous step. Such a test experiment is called adaptive testing. Sequential experiments can be carried out either by observing only output responses of the UUT or by pinpointing by a special probe also internal control points of the UUT (guided probing). Sequential diagnosis procedure can be graphically represented as diagnostic tree.
3.3.1.
Fault location by edge-pin testing
3.3.2. Generating tests to distinguish faults
3.3.3. Guided-probe testing
3.3.4. Fault location by UUT reduction
3.3.1. Fault Location by Edge-Pin Testing
In fault diagnosis test patterns are applied to the UUT step by step. In each step, only output signals at edge-pins of the UUT are observed and their values are compared to the expected ones. The next test pattern to be applied in adaptive testing depends on the result of the previous step. The diagnostic tree of this process consists of the fault nodes FN (rectangles) and test nodes TN (circles). A FN is labeled by a set of not yet distinguished faults. The starting fault node is labeled by the set of all faults. To each FN k a TN is linked labeled by a test pattern Tk to be applied as the next. Every test pattern distinguishes between the faults it detects and the ones it does not. The task of the test pattern Tk is to divide the faults in FN k into two groups - detected and not detected by Tk faults. Each test node has two outgoing edges corresponding to the results of the experiment of this test pattern. The results are indicated as passed (P) or failed (F). The set of faults shown in a current fault node (rectangle) are equivalent (not distinguished) under the currently applied test set.
Example:
The diagnostic tree in the Figure below corresponds to the example considered in 3.2.1. We can see that most of the faults are uniquely identified, two faults F1,F4 remain indistinguishable. Not all test patterns used in the fault table are needed. Different faults need for identifying test sequences with different lengths. The shortest test contains two patterns the longest four patterns.
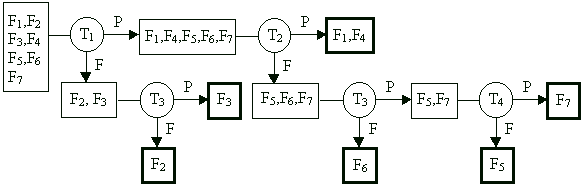
Rather than applying the entire test sequence in a fixed order as in combinational
fault diagnosis, adaptive testing determines the next vector to be applied based
on the results obtained by the preceding vectors. In our example, if T1
fails, the possible faults are {F2,F3}. At this
point applying T2 would be wasteful, because T2
does not distinguish among these faults. The use of adaptive testing may
substantially decrease the average number of tests required to locate a fault.
3.3.2. Generating Tests to Distinguish Faults
To improve the fault resolution of a given test set T, it is necessary to generate tests to distinguish among faults equivalent under T.
Consider the problem of generating a test to distinguish between faults F1 and F2. Such a test must detect one of these faults but not the other, or vice versa. The following cases are possible.
Three possibilities can
be mentioned to keep a fault F2: xk![]() e
not activated, where xk denotes a line in the circuit, and e
e
not activated, where xk denotes a line in the circuit, and e![]() {0,1}:
{0,1}:
Example:
Guided-probe testing extends edge-pin testing process by monitoring internal signals in the UUT via a probe which is moved (usually by an operator) following the guidance provided by the test equipment. The principle of guided-probe testing is to backtrace an error from the primary output where it has been observed during edge-pin testing to its physical location in the UUT. Probing is carried out step-by-step. In each step an internal signal is probed and compared to the expected value. The next probing depends on the result of the previous step.
A diagnostic tree can be created for the given test pattern to control the process of probing. The tree consists of internal nodes (circles) to mark the internal lines to be probed, and of terminal nodes (rectangles) to show the possible result of diagnosis. The results of probing are indicated as passed (P) or failed (F).
Typical faults located are opens and defective components. An open between two points A and B in a connection line is identified by a mismatch between the error observed at B and the correct value measured at A. A faulty device is identified by detecting an error at one of its outputs, while only correct values are measured at its inputs.
The most time-consuming part of guided-probe testing is moving the probe. To speed-up the fault location process, we need to reduce the number of probed lines. A lot of methods to minimize the number of probings are available.
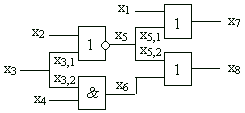
Example:
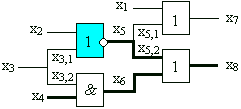
Let have a test pattern 1010 applied to the inputs of the circuit. The diagnostic tree created for this particular test pattern is shown. On the output x8 , instead of the expected value 0, an erroneous signal 1 is detected. By backtracing (indicated by bold arrows in the diagnostic tree) the faulty component NOR- x5 is located.
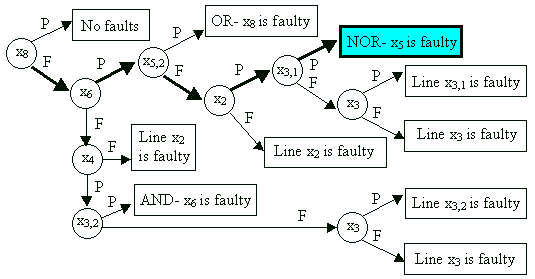
Diagnostic tree allows to carry out optimization of the fault location procedure,
for example to generate a procedure with minimum average number of probes.
3.3.4. Fault Location by UUT Reduction
Initially the UUT is the entire circuit and the process starts when its test fails. While the failing UUT can be partitioned, half of the UUT is disabled and the remaining half is tested. If the test passes, the fault must be in the disabled part, which then becomes the UUT. If the test fails, the tested part becomes the UUT.
| |
|
|
Last update: 28 July, 2004